OTP required for all users
Implement a multi-factor authentication policy requiring all users to complete an OTP challenge.
Overview
This page shows how to implement an MFA policy that requires all users to complete an OTP challenge before accessing your application. The OTP can be sent via email or phone.
Single tenant setup
Backend setup
To start with, configure the backend in the following way:
import supertokens, { User, RecipeUserId } from "supertokens-node";
import { UserContext } from "supertokens-node/types";
import ThirdParty from "supertokens-node/recipe/thirdparty";
import EmailPassword from "supertokens-node/recipe/emailpassword";
import MultiFactorAuth from "supertokens-node/recipe/multifactorauth";
import Passwordless from "supertokens-node/recipe/passwordless";
import Session from "supertokens-node/recipe/session";
import AccountLinking from "supertokens-node/recipe/accountlinking";
import { AccountInfoWithRecipeId } from "supertokens-node/recipe/accountlinking/types";
import { SessionContainerInterface } from "supertokens-node/recipe/session/types";

supertokens.init({
  supertokens: {
    connectionURI: "...",
  },
  appInfo: {
    appName: "...",
    apiDomain: "...",
    websiteDomain: "...",
  },
  recipeList: [
    Session.init(),
    ThirdParty.init({
      //...
    }),
    EmailPassword.init({
      //...
    }),
    Passwordless.init({
      contactMethod: "EMAIL",
      flowType: "USER_INPUT_CODE",
    }),
    AccountLinking.init({
      shouldDoAutomaticAccountLinking: async (
        newAccountInfo: AccountInfoWithRecipeId & { recipeUserId?: RecipeUserId },
        user: User | undefined,
        session: SessionContainerInterface | undefined,
        tenantId: string,
        userContext: UserContext,
      ) => {
        if (session === undefined) {
          // we do not want to do first factor account linking by default. To enable that,
          // please see the automatic account linking docs in the recipe docs for your first factor.
          return {
            shouldAutomaticallyLink: false,
          };
        }
        if (user === undefined || session.getUserId() === user.id) {
          // if it comes here, it means that a session exists, and we are trying to link the
          // newAccountInfo to the session user, which means it's an MFA flow, so we enable
          // linking here.
          return {
            shouldAutomaticallyLink: true,
            shouldRequireVerification: true,
          };
        }
        return {
          shouldAutomaticallyLink: false,
        };
      },
    }),
    MultiFactorAuth.init({
      firstFactors: [MultiFactorAuth.FactorIds.EMAILPASSWORD, MultiFactorAuth.FactorIds.THIRDPARTY],
      override: {
        functions: (originalImplementation) => {
          return {
            ...originalImplementation,
            getMFARequirementsForAuth: async function (input) {
              return [MultiFactorAuth.FactorIds.OTP_EMAIL];
            },
          };
        },
      },
    }),
  ],
});
from supertokens_python import init, InputAppInfo, SupertokensConfig
from supertokens_python.recipe import (
accountlinking,
emailpassword,
multifactorauth,
passwordless,
session,
thirdparty,
)
from supertokens_python.recipe.passwordless import ContactEmailOnlyConfig
from supertokens_python.recipe.multifactorauth.types import FactorIds, OverrideConfig, MFARequirementList
from supertokens_python.recipe.multifactorauth.interfaces import RecipeInterface
from supertokens_python.recipe.session.interfaces import SessionContainer
from supertokens_python.recipe.accountlinking.types import (
AccountInfoWithRecipeIdAndUserId,
ShouldNotAutomaticallyLink,
ShouldAutomaticallyLink,
)
from supertokens_python.types import User
from typing import Dict, Any, Callable, Awaitable, List, Optional, Union
async def should_do_automatic_account_linking(
new_account_info: AccountInfoWithRecipeIdAndUserId,
user: Optional[User],
session: Optional[SessionContainer],
tenant_id: str,
user_context: Dict[str, Any]
) -> Union[ShouldNotAutomaticallyLink, ShouldAutomaticallyLink]:
if session is None:
# We do not want to do first factor account linking by default.
# To enable that, please see the automatic account linking docs
# in the recipe docs for your first factor.
return ShouldNotAutomaticallyLink()
if user is None or session.get_user_id() == user.id:
# If it comes here, it means that a session exists, and we are trying to link the
# new_account_info to the session user, which means it's an MFA flow, so we enable
# linking here.
return ShouldAutomaticallyLink(should_require_verification=True)
return ShouldNotAutomaticallyLink()
def override_functions(original_implementation: RecipeInterface):
async def get_mfa_requirements_for_auth(
tenant_id: str,
access_token_payload: Dict[str, Any],
completed_factors: Dict[str, int],
user: Callable[[], Awaitable[User]],
factors_set_up_for_user: Callable[[], Awaitable[List[str]]],
required_secondary_factors_for_user: Callable[[], Awaitable[List[str]]],
required_secondary_factors_for_tenant: Callable[[], Awaitable[List[str]]],
user_context: Dict[str, Any],
) -> MFARequirementList:
return [FactorIds.OTP_EMAIL]
original_implementation.get_mfa_requirements_for_auth = (
get_mfa_requirements_for_auth
)
return original_implementation
init(
app_info=InputAppInfo(
app_name="...",
api_domain="...",
website_domain="...",
),
supertokens_config=SupertokensConfig(
connection_uri="...",
),
framework="...",
recipe_list=[
session.init(),
emailpassword.init(),
thirdparty.init(),
passwordless.init(
contact_config=ContactEmailOnlyConfig(), flow_type="USER_INPUT_CODE"
),
accountlinking.init(
should_do_automatic_account_linking=should_do_automatic_account_linking
),
multifactorauth.init(
first_factors=[FactorIds.EMAILPASSWORD, FactorIds.THIRDPARTY],
override=OverrideConfig(functions=override_functions),
),
],
)-
Notice that the Passwordless recipe initializes in the
recipeList. In this example, only email-based OTP is enabled, withcontactMethodset toEMAILandflowTypetoUSER_INPUT_CODE(that is,otp). If you want to use phone SMS-based OTP, set the contact method toPHONE. If you want to give users both options, or for some users use email, and for others use phone, setcontactMethodtoEMAIL_OR_PHONE. -
We have also enabled the account linking feature since it’s required for MFA to work. The above enables account linking for second factor only, but if you also want to enable it for first factor, see this section.
-
shouldRequireVerification: trueprevents an unverified login method from being linked. Passwordless OTP completion verifies the email address or phone number before the SDK attempts second-factor linking, so this does not block the OTP flow. Keep the callback session-bound as shown; do not return automatic linking for first-factor requests without a session. -
The
getMFARequirementsForAuthfunction is overridden to indicate thatotp-emailmust be completed before the user can access the app. Notice thatuserIdis not checked there, andotp-emailis returned for all users. You can also returnotp-phoneinstead if you want users to complete the OTP challenge via a phone SMS. Finally, if you want to give users an option for email or phone, you can return the following array from the function:[ { "oneOf": ["otp-email", "otp-phone"] } ]
Once the user finishes the first factor (for example, with emailpassword), their session access token payload looks like this:
{
  "st-mfa": {
    "c": {
      "emailpassword": 1702877939
    },
    "v": false
  }
}
The v being false indicates that there are still factors that are pending. After the user has finished otp-email, the payload looks like:
{
  "st-mfa": {
    "c": {
      "emailpassword": 1702877939,
      "otp-email": 1702877999
    },
    "v": true
  }
}
This indicates that the user has finished all required factors and should be allowed to access the app.
Frontend setup
We start by modifying the init function call on the frontend like this:
You have to make changes to the auth route configuration, as well as to the supertokens-web-js SDK configuration at the root of your application:
This change is in your auth route configuration.
import supertokens from "supertokens-auth-react";
import ThirdParty from "supertokens-auth-react/recipe/thirdparty";
import EmailPassword from "supertokens-auth-react/recipe/emailpassword";
import Passwordless from "supertokens-auth-react/recipe/passwordless";
import MultiFactorAuth from "supertokens-auth-react/recipe/multifactorauth";

supertokens.init({
  appInfo: {
    appName: "...",
    apiDomain: "...",
    websiteDomain: "...",
  },
  recipeList: [
    ThirdParty.init(/* ... */),
    EmailPassword.init(/* ... */),
    Passwordless.init({
      contactMethod: "EMAIL",
    }),
    MultiFactorAuth.init({
      firstFactors: [MultiFactorAuth.FactorIds.EMAILPASSWORD, MultiFactorAuth.FactorIds.THIRDPARTY],
    }),
  ],
});
// this goes in the auth route config of your frontend app (once the pre-built UI script has been loaded)
supertokensUIInit({
appInfo: {
appName: "...",
apiDomain: "...",
websiteDomain: "...",
},
recipeList: [
supertokensUIThirdParty.init(/* ... */),
supertokensUIEmailPassword.init(/* ... */),
supertokensUIPasswordless.init({
contactMethod: "EMAIL",
}),
supertokensUIMultiFactorAuth.init({
firstFactors: [
supertokensUIMultiFactorAuth.FactorIds.EMAILPASSWORD,
supertokensUIMultiFactorAuth.FactorIds.THIRDPARTY,
],
}),
],
});This change goes in the supertokens-web-js SDK configuration at the root of your application:
import SuperTokens from "supertokens-web-js";
import MultiFactorAuth from "supertokens-web-js/recipe/multifactorauth";
import Passwordless from "supertokens-web-js/recipe/passwordless";

SuperTokens.init({
  appInfo: {
    apiDomain: "...",
    apiBasePath: "...",
    appName: "...",
  },
  recipeList: [
    // other recipes...
    MultiFactorAuth.init(),
    Passwordless.init(),
  ],
});- Like on the backend, the
passwordlessrecipe initializes in therecipeList. ThecontactMethodneeds to be consistent with the backend setting. - The
MultiFactorAuthrecipe is also initialized, and the first factors to use are included. In this case, that would beemailpasswordandthirdparty- same as the backend.
Next, add the Passwordless pre-built UI when rendering the SuperTokens component:
import { SuperTokensWrapper } from "supertokens-auth-react";
import { getSuperTokensRoutesForReactRouterDom } from "supertokens-auth-react/ui";
import { EmailPasswordPreBuiltUI } from "supertokens-auth-react/recipe/emailpassword/prebuiltui";
import { ThirdPartyPreBuiltUI } from "supertokens-auth-react/recipe/thirdparty/prebuiltui";
import { MultiFactorAuthPreBuiltUI } from "supertokens-auth-react/recipe/multifactorauth/prebuiltui";
import { PasswordlessPreBuiltUI } from "supertokens-auth-react/recipe/passwordless/prebuiltui";
import reactRouterDOM, { Routes, BrowserRouter as Router, Route } from "react-router-dom";

function App() {
  return (
    <SuperTokensWrapper>
      <div className="App">
        <Router>
          <div className="fill">
            <Routes>
              {getSuperTokensRoutesForReactRouterDom(reactRouterDOM, [
                EmailPasswordPreBuiltUI,
                ThirdPartyPreBuiltUI,
                PasswordlessPreBuiltUI,
                MultiFactorAuthPreBuiltUI,
              ])}
              // ... other routes
            </Routes>
          </div>
        </Router>
      </div>
    </SuperTokensWrapper>
  );
}import { SuperTokensWrapper } from "supertokens-auth-react";
import { canHandleRoute, getRoutingComponent } from "supertokens-auth-react/ui";
import { EmailPasswordPreBuiltUI } from "supertokens-auth-react/recipe/emailpassword/prebuiltui";
import { ThirdPartyPreBuiltUI } from "supertokens-auth-react/recipe/thirdparty/prebuiltui";
import { MultiFactorAuthPreBuiltUI } from "supertokens-auth-react/recipe/multifactorauth/prebuiltui";
import { PasswordlessPreBuiltUI } from "supertokens-auth-react/recipe/passwordless/prebuiltui";
function App() {
if (
canHandleRoute([EmailPasswordPreBuiltUI, ThirdPartyPreBuiltUI, PasswordlessPreBuiltUI, MultiFactorAuthPreBuiltUI])
) {
return getRoutingComponent([
EmailPasswordPreBuiltUI,
ThirdPartyPreBuiltUI,
PasswordlessPreBuiltUI,
MultiFactorAuthPreBuiltUI,
]);
}
return <SuperTokensWrapper>{/*Your app*/}</SuperTokensWrapper>;
}With the above configuration, users see emailpassword or social login UI when they visit the auth page. After completing that, users redirect to /auth/mfa/otp-email (assuming that the websiteBasePath is /auth) where they are asked to complete the OTP challenge. The UI for this screen looks like:
- Factor Setup UI (This is in case the first factor doesn’t provide an email for the user. In this example, the first factor does provide an email since it’s email password or social login).
- Verification UI.
We start by initializing the MFA and Passwordless recipe on the frontend like this:
import SuperTokens from "supertokens-web-js";
import MultiFactorAuth from "supertokens-web-js/recipe/multifactorauth";
import Passwordless from "supertokens-web-js/recipe/passwordless";

SuperTokens.init({
  appInfo: {
    apiDomain: "...",
    apiBasePath: "...",
    appName: "...",
  },
  recipeList: [
    // other recipes...
    MultiFactorAuth.init(),
    Passwordless.init(),
  ],
});supertokens.init({
appInfo: {
apiDomain: "...",
apiBasePath: "...",
appName: "...",
},
recipeList: [
// other recipes...
supertokensMultiFactorAuth.init(),
supertokensPasswordless.init(),
],
});After the first factor login, you should start by checking the access token payload and see if the MFA claim’s v boolean is false. If it’s not, then the user can redirect to the application page.
If it’s false, the frontend then needs to call the MFA endpoint to get information about which factor the user should complete next. Based on the backend configuration in this page, the next array contains ["otp-email"].
Two possibilities exist here:
- Case 1: The user needs to set up an email to send the OTP to. This only happens if the first factor doesn’t provide an email from the user (for example, if you used phone-based
otpas the first factor). In this example on this doc, an email is always obtained from the first factor, so you do not need to build UI for this step (but this will still be discussed later on). - Case 2: The user already has an email associated with them and needs to complete the OTP challenge.
We can know which case it is by checking if the emails object returned from MFA Info endpoint contains any emails associated with the otp-email key. If the emails["otp-email"] property of the response is undefined or an empty array, then it’s case 1, else it’s case 2.
Case 1 implementation: User needs to enter their email
In this case, a form needs to be created wherein the user can enter their email. Once they submit the form, the createCode API needs to be called.
After this API call, you can show the user the enter OTP screen, and call the consumeCode API. If the API call returns a RESTART_FLOW_ERROR, you can handle this by asking the user to enter their email once again and then call the createCode function.
Case 2 implementation: User needs to complete the OTP challenge
This case is when the user already has an email associated with their account and you can directly send a code to that email. You can get the email to send the code to from the result of the MFA Info endpoint. Specifically, from the response, you can read the email from the emails property like this: emails["otp-email"][0]. The first item in the array of emails is picked since the emails are ordered based on:
- Index 0 contains the email that belongs to the session’s user. If the user’s first factor was email password, the email in the 0th index of the array is that email.
- The other emails in the array (if they exist), are from other login methods for this user ordered based on the oldest login method first.
You can even show a UI here asking the user to pick an email from the array if you like. Either way, when you have an email, you can call the createCode API to send the code to that email.
After this API call, you can show the user the enter OTP screen, and call the consumeCode API. If the API call returns a RESTART_FLOW_ERROR, you can handle this by calling the createCode function once again in the background.
We recommend that you add a sign out button when showing the second factor (case 1 or case 2) so that users can use this to escape out of the flow in case they are unable to complete the second factor. When the sign out button is clicked, you want to:
- Call the
await clearLoginAttemptInfo()function (if on web) to clear the state that’s set in the browser storage when calling thecreateCodefunction. - Call the sign out function / API to clear the tokens.
On successful verification of the code, the otp-email factor is marked as completed and the v value is updated in the session based on if there are any more factors that the user needs to complete. The next step would be to check this v value in the MFA claim and redirect the user to the application page, or get information about the next factor using the MFA info endpoint.
Multi tenant setup
In a multi-tenancy setup, you may want to enable email / phone OTP for all users, across all tenants, or for all users within specific tenants. For enabling for all users across all tenants, it’s the same steps as in the single tenant setup section above, so in this section, we will focus on enabling OTP for all users within specific tenants.
Backend setup
To start, initialize the Passwordless and the MultiFactorAuth recipes in the following way:
import supertokens, { User, RecipeUserId } from "supertokens-node";
import { UserContext } from "supertokens-node/types";
import ThirdParty from "supertokens-node/recipe/thirdparty";
import EmailPassword from "supertokens-node/recipe/emailpassword";
import MultiFactorAuth from "supertokens-node/recipe/multifactorauth";
import Passwordless from "supertokens-node/recipe/passwordless";
import Session from "supertokens-node/recipe/session";
import { AccountInfoWithRecipeId } from "supertokens-node/recipe/accountlinking/types";
import { SessionContainerInterface } from "supertokens-node/recipe/session/types";
import AccountLinking from "supertokens-node/recipe/accountlinking";

supertokens.init({
  supertokens: {
    connectionURI: "...",
  },
  appInfo: {
    appName: "...",
    apiDomain: "...",
    websiteDomain: "...",
  },
  recipeList: [
    Session.init(),
    ThirdParty.init({
      //...
    }),
    EmailPassword.init({
      //...
    }),
    Passwordless.init({
      contactMethod: "EMAIL",
      flowType: "USER_INPUT_CODE",
    }),
    AccountLinking.init({
      shouldDoAutomaticAccountLinking: async (
        newAccountInfo: AccountInfoWithRecipeId & { recipeUserId?: RecipeUserId },
        user: User | undefined,
        session: SessionContainerInterface | undefined,
        tenantId: string,
        userContext: UserContext,
      ) => {
        if (session === undefined) {
          // we do not want to do first factor account linking by default. To enable that,
          // please see the automatic account linking docs in the recipe docs for your first factor.
          return {
            shouldAutomaticallyLink: false,
          };
        }
        if (user === undefined || session.getUserId() === user.id) {
          // if it comes here, it means that a session exists, and we are trying to link the
          // newAccountInfo to the session user, which means it's an MFA flow, so we enable
          // linking here.
          return {
            shouldAutomaticallyLink: true,
            shouldRequireVerification: true,
          };
        }
        return {
          shouldAutomaticallyLink: false,
        };
      },
    }),
    MultiFactorAuth.init(),
  ],
});
from supertokens_python import init, InputAppInfo, SupertokensConfig
from supertokens_python.recipe import (
accountlinking,
emailpassword,
multifactorauth,
passwordless,
session,
thirdparty,
)
from supertokens_python.recipe.passwordless import ContactEmailOnlyConfig
from supertokens_python.recipe.session.interfaces import SessionContainer
from supertokens_python.recipe.accountlinking.types import (
AccountInfoWithRecipeIdAndUserId,
ShouldNotAutomaticallyLink,
ShouldAutomaticallyLink,
)
from supertokens_python.types import User
from typing import Dict, Any, Optional, Union
async def should_do_automatic_account_linking(
new_account_info: AccountInfoWithRecipeIdAndUserId,
user: Optional[User],
session: Optional[SessionContainer],
tenant_id: str,
user_context: Dict[str, Any]
) -> Union[ShouldNotAutomaticallyLink, ShouldAutomaticallyLink]:
if session is None:
# We do not want to do first factor account linking by default.
# To enable that, please see the automatic account linking docs
# in the recipe docs for your first factor.
return ShouldNotAutomaticallyLink()
if user is None or session.get_user_id() == user.id:
# If it comes here, it means that a session exists, and we are trying to link the
# new_account_info to the session user, which means it's an MFA flow, so we enable
# linking here.
return ShouldAutomaticallyLink(should_require_verification=True)
return ShouldNotAutomaticallyLink()
init(
app_info=InputAppInfo(
app_name="...",
api_domain="...",
website_domain="...",
),
supertokens_config=SupertokensConfig(
connection_uri="...",
),
framework="...",
recipe_list=[
session.init(),
emailpassword.init(),
thirdparty.init(),
passwordless.init(
contact_config=ContactEmailOnlyConfig(), flow_type="USER_INPUT_CODE"
),
accountlinking.init(
should_do_automatic_account_linking=should_do_automatic_account_linking
),
multifactorauth.init(),
],
)Unlike the single tenant setup, no configuration is provided to the MultiFactorAuth recipe because all the necessary configuration is done on a tenant level.
To configure otp-email requirement for a tenant, the following API can be called:
To configure otp-email requirement for a tenant, the following API can be called:
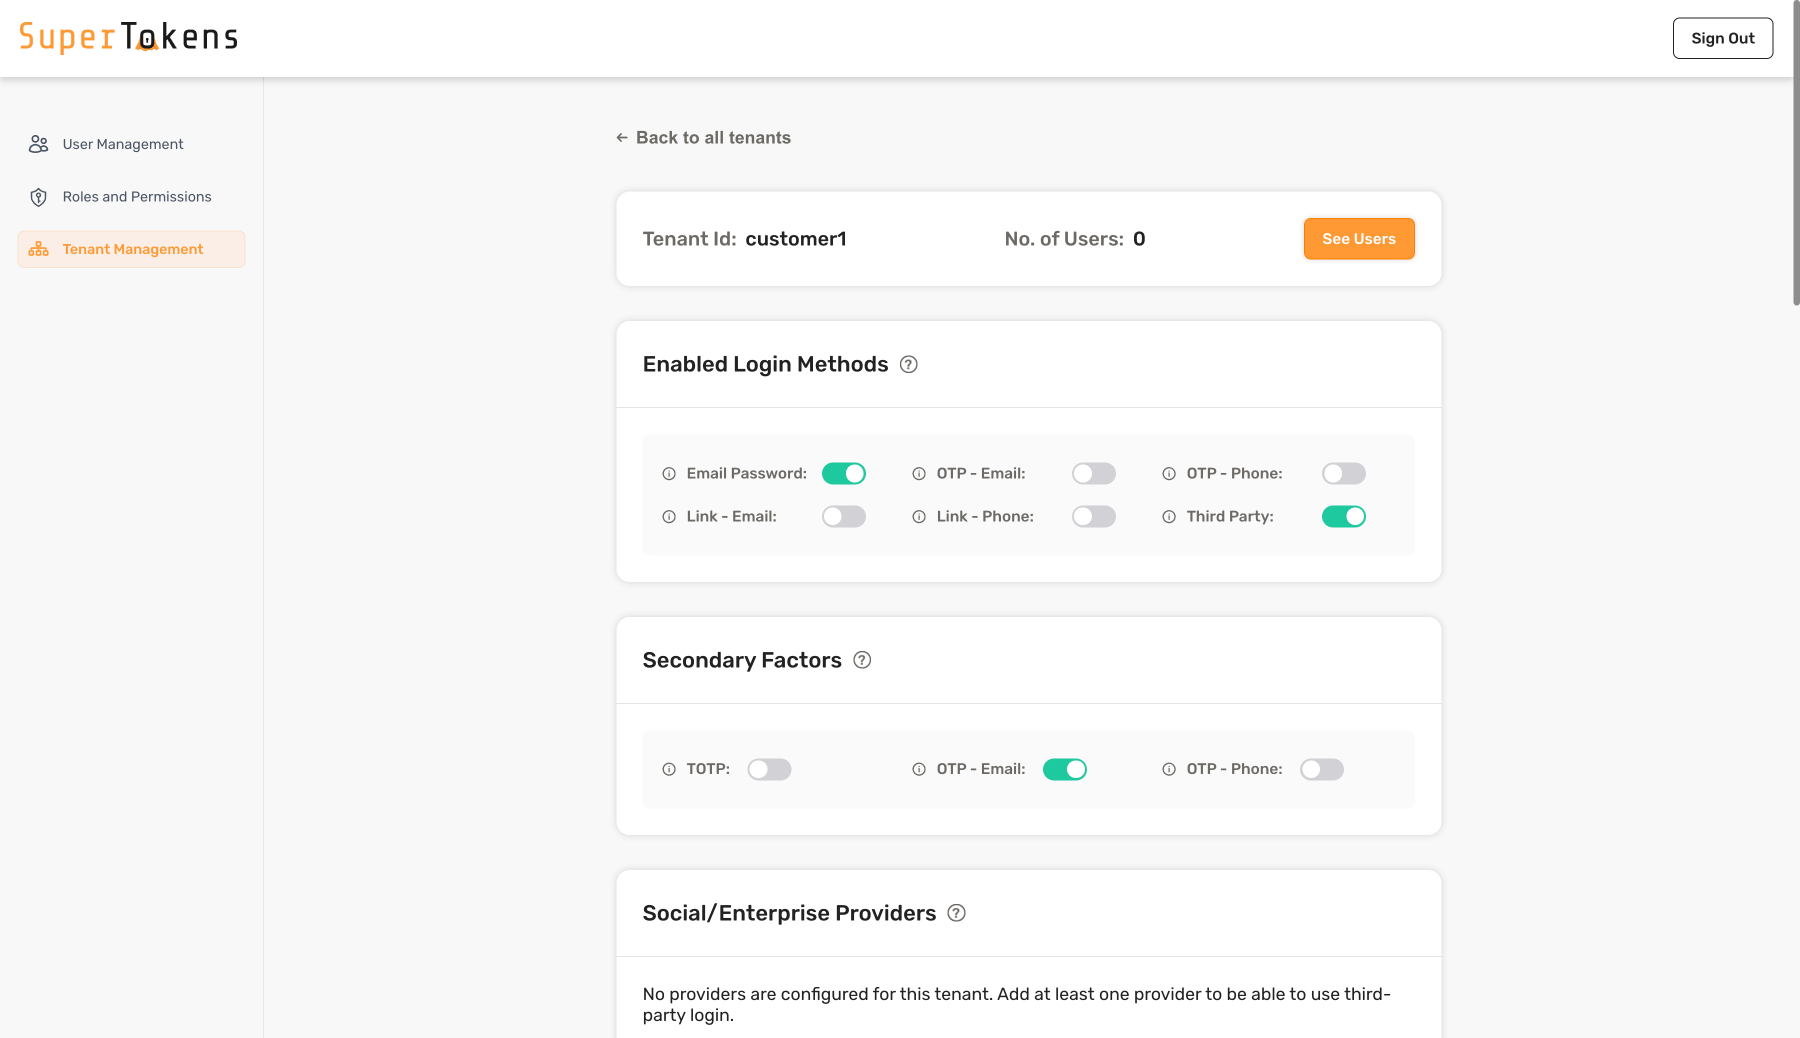
As shown above, enable Email Password and Third Party in the Login methods section and enable OTP - Email in the Secondary Factors Section.
import Multitenancy from "supertokens-node/recipe/multitenancy";
import MultiFactorAuth from "supertokens-node/recipe/multifactorauth";

async function createNewTenant() {
  let resp = await Multitenancy.createOrUpdateTenant("customer1", {
    firstFactors: [MultiFactorAuth.FactorIds.EMAILPASSWORD, MultiFactorAuth.FactorIds.THIRDPARTY],
    requiredSecondaryFactors: [MultiFactorAuth.FactorIds.OTP_EMAIL],
  });

  if (resp.createdNew) {
    // Tenant created successfully
  } else {
    // Existing tenant's config was modified.
  }
}from supertokens_python.recipe.multitenancy.asyncio import create_or_update_tenant
from supertokens_python.recipe.multitenancy.interfaces import TenantConfigCreateOrUpdate
from supertokens_python.recipe.multifactorauth.types import FactorIds
async def create_new_tenant():
resp = await create_or_update_tenant(
"customer1",
TenantConfigCreateOrUpdate(
first_factors=[FactorIds.EMAILPASSWORD, FactorIds.THIRDPARTY],
required_secondary_factors=[FactorIds.OTP_EMAIL],
),
)
if resp.created_new:
# Tenant created successfully
pass
else:
# Existing tenant's config was modified
passfrom supertokens_python.recipe.multitenancy.syncio import create_or_update_tenant
from supertokens_python.recipe.multitenancy.interfaces import TenantConfigCreateOrUpdate
from supertokens_python.recipe.multifactorauth.types import FactorIds
def create_new_tenant():
resp = create_or_update_tenant(
"customer1",
TenantConfigCreateOrUpdate(
first_factors=[FactorIds.EMAILPASSWORD, FactorIds.THIRDPARTY],
required_secondary_factors=[FactorIds.OTP_EMAIL],
),
)
if resp.created_new:
# Tenant created successfully
pass
else:
# Existing tenant's config was modified
passcurl --location --request PUT 'http://localhost:3567/recipe/multitenancy/tenant/v2' \
--header 'api-key: YOUR_API_KEY' \
--header 'Content-Type: application/json' \
--data-raw '{
"tenantId": "customer1",
"firstFactors": ["emailpassword", "thirdparty"],
"requiredSecondaryFactors": ["otp-email"]
}'- In the above, the
firstFactorsare set to["emailpassword", "thirdparty"]to indicate that the first factor can be eitheremailpasswordorthirdparty. - The
requiredSecondaryFactorsis set to["otp-email"]to indicate that OTP email is required for all users in this tenant. The default implementation ofgetMFARequirementsForAuthin theMultiFactorAuthtakes this into account.
- In the above, the
firstFactorsare set to["emailpassword", "thirdparty"]to indicate that the first factor can be eitheremailpasswordorthirdparty. - The
requiredSecondaryFactorsis set to["otp-email"]to indicate that OTP email is required for all users in this tenant. The default implementation ofgetMFARequirementsForAuthin theMultiFactorAuthtakes this into account.
Once the user finishes the first factor (for example, with emailpassword), their session access token payload looks like this:
{
  "st-mfa": {
    "c": {
      "emailpassword": 1702877939
    },
    "v": false
  }
}
The v being false indicates that there are still factors that are pending. After the user has finished otp-email challenge, the payload looks like:
{
  "st-mfa": {
    "c": {
      "emailpassword": 1702877939,
      "otp-email": 1702877999
    },
    "v": true
  }
}
This indicates that the user has finished all required factors and should be allowed to access the app.
Frontend setup
We start by modifying the init function call on the frontend like this:
You have to make changes to the auth route configuration, as well as to the supertokens-web-js SDK configuration at the root of your application:
This change is in your auth route configuration.
import supertokens from "supertokens-auth-react";
import ThirdParty from "supertokens-auth-react/recipe/thirdparty";
import EmailPassword from "supertokens-auth-react/recipe/emailpassword";
import MultiFactorAuth from "supertokens-auth-react/recipe/multifactorauth";
import Passwordless from "supertokens-auth-react/recipe/passwordless";
import Multitenancy from "supertokens-auth-react/recipe/multitenancy";

supertokens.init({
  appInfo: {
    appName: "...",
    apiDomain: "...",
    websiteDomain: "...",
  },
  usesDynamicLoginMethods: true,
  recipeList: [
    ThirdParty.init({
      //...
    }),
    EmailPassword.init({
      //...
    }),
    Passwordless.init({
      contactMethod: "EMAIL",
    }),
    MultiFactorAuth.init(),
    Multitenancy.init({
      override: {
        functions: (originalImplementation) => {
          return {
            ...originalImplementation,
            getTenantId: async (context) => {
              return "TODO";
            },
          };
        },
      },
    }),
  ],
});
// this goes in the auth route config of your frontend app (once the pre-built UI script has been loaded)
supertokensUIInit({
appInfo: {
appName: "...",
apiDomain: "...",
websiteDomain: "...",
},
usesDynamicLoginMethods: true,
recipeList: [
supertokensUIThirdParty.init({
//...
}),
supertokensUIEmailPassword.init({
//...
}),
supertokensUIPasswordless.init({
contactMethod: "EMAIL",
}),
supertokensUIMultiFactorAuth.init(),
supertokensUIMultitenancy.init({
override: {
functions: (originalImplementation) => {
return {
...originalImplementation,
getTenantId: async (context) => {
return "TODO";
},
};
},
},
}),
],
});This change goes in the supertokens-web-js SDK configuration at the root of your application:
supertokens.init({
  appInfo: {
    apiDomain: "...",
    apiBasePath: "...",
    appName: "...",
  },
  recipeList: [Session.init(), MultiFactorAuth.init()],
});- Like on the backend, the
Passwordlessrecipe initializes in therecipeList. Make sure that the configuration for it is consistent with what’s on the backend. - The
MultiFactorAuthrecipe is also initialized. Notice that unlike the single tenant setup, thefirstFactorsare not specified here. That information is fetched based on thetenantIdyou provide the SDK with. usesDynamicLoginMethods: trueis set so that the SDK knows to fetch the login methods dynamically based on thetenantId.- Finally, the multi-tenancy recipe initializes and a method for getting the
tenantIdis provided.
Next, add the Passwordless pre-built UI when rendering the SuperTokens component:
import { SuperTokensWrapper } from "supertokens-auth-react";
import { getSuperTokensRoutesForReactRouterDom } from "supertokens-auth-react/ui";
import { EmailPasswordPreBuiltUI } from "supertokens-auth-react/recipe/emailpassword/prebuiltui";
import { ThirdPartyPreBuiltUI } from "supertokens-auth-react/recipe/thirdparty/prebuiltui";
import { MultiFactorAuthPreBuiltUI } from "supertokens-auth-react/recipe/multifactorauth/prebuiltui";
import { PasswordlessPreBuiltUI } from "supertokens-auth-react/recipe/passwordless/prebuiltui";
import reactRouterDOM, { Routes, BrowserRouter as Router, Route } from "react-router-dom";

function App() {
  return (
    <SuperTokensWrapper>
      <div className="App">
        <Router>
          <div className="fill">
            <Routes>
              {getSuperTokensRoutesForReactRouterDom(reactRouterDOM, [
                EmailPasswordPreBuiltUI,
                ThirdPartyPreBuiltUI,
                PasswordlessPreBuiltUI,
                MultiFactorAuthPreBuiltUI,
              ])}
              // ... other routes
            </Routes>
          </div>
        </Router>
      </div>
    </SuperTokensWrapper>
  );
}import { SuperTokensWrapper } from "supertokens-auth-react";
import { canHandleRoute, getRoutingComponent } from "supertokens-auth-react/ui";
import { EmailPasswordPreBuiltUI } from "supertokens-auth-react/recipe/emailpassword/prebuiltui";
import { ThirdPartyPreBuiltUI } from "supertokens-auth-react/recipe/thirdparty/prebuiltui";
import { MultiFactorAuthPreBuiltUI } from "supertokens-auth-react/recipe/multifactorauth/prebuiltui";
import { PasswordlessPreBuiltUI } from "supertokens-auth-react/recipe/passwordless/prebuiltui";
function App() {
if (
canHandleRoute([EmailPasswordPreBuiltUI, ThirdPartyPreBuiltUI, PasswordlessPreBuiltUI, MultiFactorAuthPreBuiltUI])
) {
return getRoutingComponent([
EmailPasswordPreBuiltUI,
ThirdPartyPreBuiltUI,
PasswordlessPreBuiltUI,
MultiFactorAuthPreBuiltUI,
]);
}
return <SuperTokensWrapper>{/*Your app*/}</SuperTokensWrapper>;
}With the above configuration, users see the first and second factor based on the tenant configuration. For the tenant configured above, users see email password or social login first. After completing that, users redirect to /auth/mfa/otp-email (assuming that the websiteBasePath is /auth) where they are asked to complete the OTP challenge. The UI for this screen looks like:
- Factor Setup UI (This is in case the first factor doesn’t provide an email for the user. In this example, the first factor does provide an email since it’s email password or social login).
- Verification UI.
The steps here are the same as in the single tenant setup above.